How to Move from Google Photos to Box: A Comprehensive Guide
Learn how to easily move your cherished memories from Google Photos to Box with this step-by-step guide, ensuring your photos are organized and securely stored.
Introduction
Moving photos from Google Photos to Box can seem daunting at first, but with the right tools and approach, it can be a smooth and efficient process. This guide will walk you through every step of the transition, from preparing your photos for transfer to organizing them in your new Box account. Whether you're looking to take advantage of Box's robust security features or its superior organization capabilities, this article has you covered.
Understanding Google Photos
Google Photos has been a go-to solution for photo storage, thanks to its user-friendly interface and automatic backup features. However, you might be considering a move to Box for its enhanced security measures, collaboration tools, or simply for a change.
Exploring Box
Box offers a suite of advanced features designed to make photo storage and sharing as intuitive and secure as possible. From customizable sharing options to integrations with numerous productivity apps, Box stands out as a powerful tool for personal and professional use.
Preparing for the Move
Before you start transferring your photos, it's important to organize them in Google Photos and set up your Box account correctly. This preparation will make the moving process more streamlined and ensure that no photo gets left behind.
Review and Organize Your Google Photos Library
-
Clean Up: Begin by reviewing your Google Photos library. This is an excellent opportunity to delete any duplicates, blurry photos, or unnecessary images that don't need to be transferred. -
Organize with Albums: Use albums to categorize your photos. Group them by events, dates, or any system that suits you. This organization will be invaluable when you decide how to structure your photos in Box.
Familiarize Yourself with Box's Structure
-
Explore Box Features:Before setting up your account, take some time to understand Box's folder and file management system. Knowing the capabilities and limitations of Box's organizational tools will help you plan the structure of your photo library. -
Create a Folder Hierarchy:Based on your understanding of Box, start planning a folder hierarchy. You might want to mirror the album structure you used in Google Photos or come up with a new system that leverages Box's features.
Backup Your Photos:
- Before starting the transfer, ensure you have a backup of your Google Photos library. This can be a safeguard against any unexpected issues during the move.
Step-by-Step Guide to Moving Photos
Exporting Photos from Google Photos
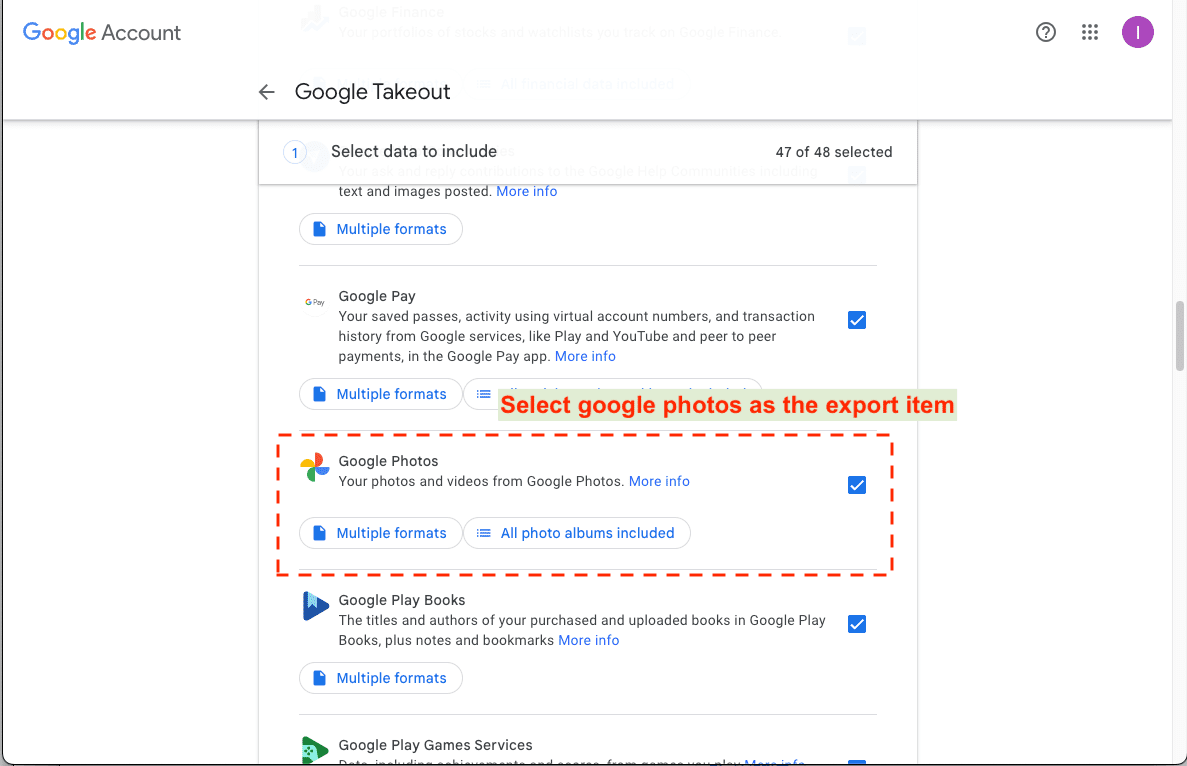
- Navigate to Google Takeout: Start by visiting the Google Takeout website. Log in with your Google account if prompted.
- Select Your Data: Click "Deselect all" and scroll down to select only "Google Photos." You can also choose specific albums if you don't want to export everything.
- Choose Export Frequency: Select "Export once" for a one-time download. For regular updates, choose to schedule exports every 2 months for a year.
- Select File Type & Size: Choose your preferred file format and maximum archive size. .zip format and 2GB size are recommended.
- Create Export: Click "Next step" and then "Create export." Google will prepare your download, which can take a few hours to several days.
- Download Your Photos: Google will email you a download link. Follow the link and download the archives to your computer.
Importing Photos to Box
- Set Up Your Box Account: Sign up for a Box account and log in.
- Prepare Your Workspace: Consider organizing your photos in Box by creating folders for different years, events, or subjects.
- Upload Photos: Use drag-and-drop, Box Drive, or the Box Mobile App to upload your photos.
Additional Tips
- Check Upload Progress: Box provides a progress indicator for uploads.
- Verify Uploads: Ensure all photos have been uploaded correctly by navigating through your Box folders.
- Organize in Box: Rename files, create more folders, and sort photos as needed for easy access.

Leveraging External Migration Tools
Exploring CloudsMover for Google Photos to Box Transition:
CloudsMover emerges as a cutting-edge tool designed for seamless data migration, particularly
between Google Photos and Box. It interfaces with over
30 distinct cloud storage platforms, offering a robust and versatile framework for
efficient data management and migration. By operating entirely via cloud, CloudsMover ensures
there's no impact on your local bandwidth, facilitating a hassle-free and user-centric transfer
experience. Tailored for the swift movement of extensive datasets, it provides an invaluable
resource for users seeking an effective and dependable means for cloud-to-cloud data transfers.
Step 1: Setting Up Google Photos on CloudsLinker:
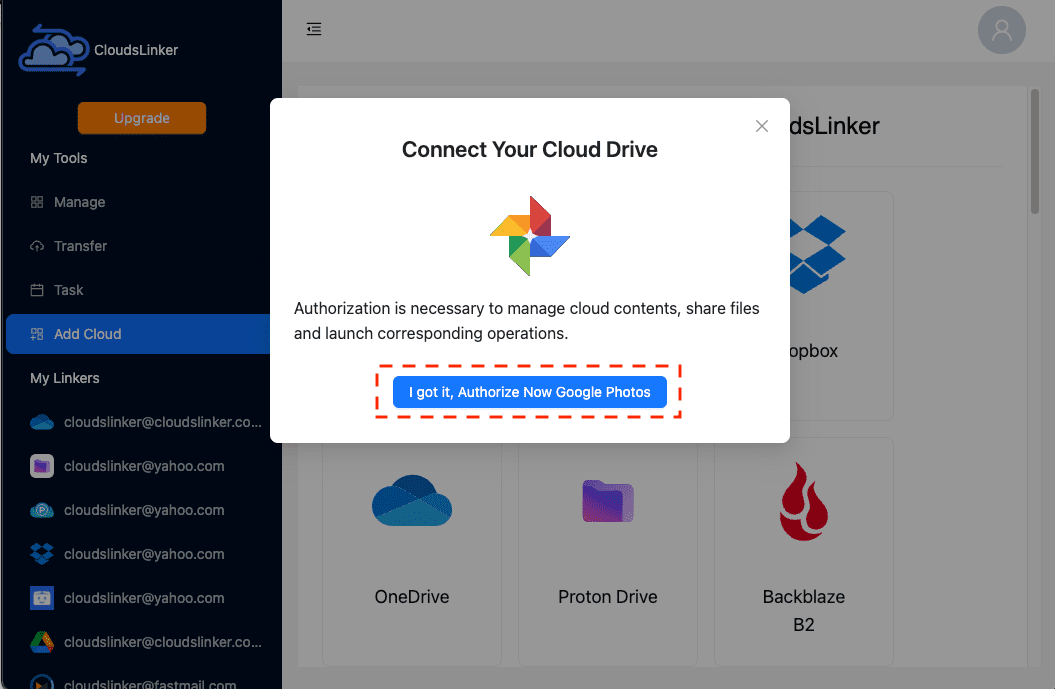
Begin your migration process by accessing CloudsLinker. Navigate to the 'add cloud' option and choose Google Photos. You'll be prompted to authorize CloudsLinker's access to your Google Photos, allowing for a secure linkage. This step integrates your Google Photos with CloudsLinker, preparing it for the transfer.

Step 2: Integrating Box with CloudsLinker:
Continue by adding your Box account to CloudsLinker. Sign in with your Box credentials and authorize CloudsLinker to access your account. This creates a secure connection between Box and CloudsLinker, facilitating a smooth migration path.

Step 3: Initiate the Transfer from Google Photos to Box:
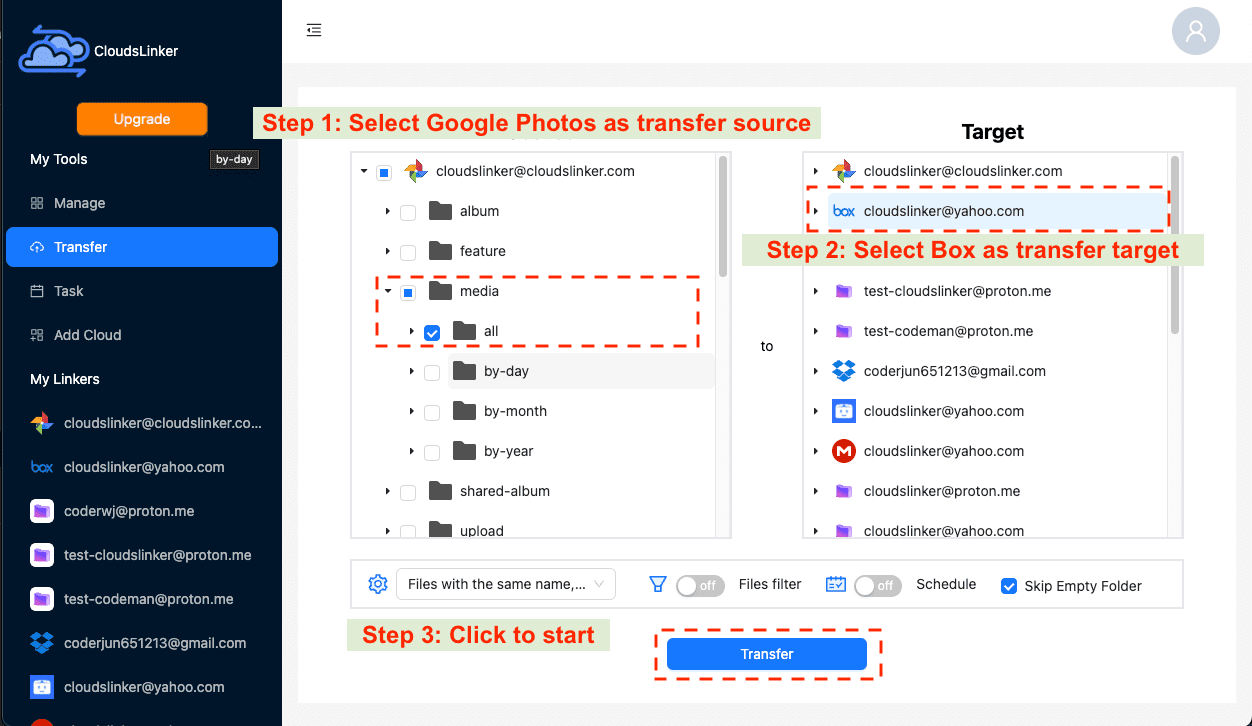
Within the 'transfer' section of CloudsLinker, select the photos or albums you wish to transfer from Google Photos. Designate Box as the destination. CloudsLinker allows you to filter and select specific photos, ensuring a customized migration experience.

Step 4: Tracking the Migration Process:
With the migration underway, you can observe the progress in CloudsLinker's 'Task' section. This area provides control over the migration, including the option to pause or cancel if needed.
Step 5: Verifying the Successful Migration to Box:
Upon completion, CloudsLinker will update the transfer status to 'finished.' Your photos are now successfully migrated to Box, where they can be accessed, managed, and shared within Box's versatile platform.
Cloudslinker merges the best features from various tools to offer a streamlined and efficient cloud data transfer experience. It's user-friendly, though some transfer costs may apply. Cloudslinker offers a generous free monthly transfer limit, accommodating the needs of most users.
Troubleshooting Common Issues
Transferring a large number of photos can sometimes lead to issues, such as file size limits or format incompatibilities. Here are some solutions to common problems you might encounter during the move:
- For file size limits, consider splitting your exports into smaller chunks.
- If you encounter format incompatibilities, use tools to convert your photos to compatible formats before transferring.
Organizing Your Photos in Box
Once your photos are in Box, taking some time to organize them can greatly enhance your storage experience. Here are some tips:
- Create folders and subfolders to categorize your photos.
- Use Box's search features to keep your photos easily accessible.
Security Considerations
Security is a major concern when it comes to cloud storage. Here's how to ensure your photos are transferred securely:
- Enable two-factor authentication for your Box account.
- Use encrypted connections during the transfer process.
Optimizing Your Box Storage
To make the most out of your Box account, managing your storage limit effectively is crucial. Here are some strategies:
- Compress photos before uploading.
- Regularly review and remove duplicates or unnecessary files.
Sharing Photos from Box
Box offers flexible sharing options that make it easy to share photos with friends, family, or colleagues. Here's how to utilize these features:
- Use shared links to give others access to your photos.
- Control who can view, download, or edit your shared photos.
Integrating Box with Other Apps
Box's ability to integrate with other apps can streamline your workflow and enhance collaboration. Here are some apps to connect with Box:
- IFTTT for automating photo organization.
- Zapier for connecting Box with over 2,000 other web services.
Frequently Asked Questions
Watch Our Detailed Tutorial
Conclusion
Moving your photos from Google Photos to Box doesn't have to be a chore. By following this comprehensive guide, you can ensure that your photos are not only safely transferred but also well-organized and easily accessible in your new cloud storage solution. Embrace the change and start making the most of what Box has to offer for your photo storage needs.
Online Storage Services Supported by CloudsLinker
Transfer data between over 40 cloud services with CloudsLinker
Didn' t find your cloud service? Be free to contact: [email protected]
Further Reading
Effortless FTP connect to google drive: Transfer Files in 3 Easy Ways
Learn More >
Google Photos to OneDrive: 3 Innovative Transfer Strategies
Learn More >
Google Photos to Proton Drive: 3 Effective Transfer Techniques
Learn More >


