Transferring Files from Seafile to Google Drive Seamlessly
Discover the ease of moving files between Seafile and Google Drive with Cloudslinker. This guide explores the streamlined process Cloudslinker offers for efficient file transfer, enhancing your cloud storage management capabilities.
Introduction
In today's digital landscape, efficiently managing files across different cloud storage services is a common challenge. Cloudslinker provides a seamless solution for those looking to transfer data from Seafile to Google Drive. This article will guide you through the simple steps to utilize Cloudslinker for a hassle-free file transfer experience, ideal for both professionals and individuals.
Transitioning from Seafile to Google Drive offers numerous advantages, enhancing your approach to digital file management:
- Advanced Collaboration Capabilities: Google Drive excels with its sophisticated collaborative features, such as real-time editing and effective file sharing, making it superior for teamwork compared to Seafile.
- Seamless Google Workspace Integration: Google Drive integrates flawlessly with Google Workspace applications (like Docs, Sheets, and Slides), boosting productivity and streamlining workflows.
- Superior Security Features: Google Drive provides enhanced security measures, including SSL encryption and two-factor authentication, offering a more secure environment than Seafile.
- User-Friendly Interface: The intuitive interface of Google Drive makes file management and navigation simpler, offering a more user-friendly experience compared to Seafile.
Although Seafile is a reliable cloud storage platform with strong file synchronization and privacy features, it lacks the extensive collaboration tools, integration with major productivity apps, and the intuitive interface that Google Drive offers, making Google Drive a more versatile and secure option for effective file management.
Utilizing Cloudslinker for Effortless File Transfers between Seafile and Google Drive
Cloudslinker streamlines the file transfer process from Seafile to Google Drive, facilitating direct cloud-to-cloud transfers and eliminating the need for local data storage. Renowned for its robust synchronization capabilities and advanced filtering options, Cloudslinker offers an intuitive interface for effective file management. For more comprehensive guidance, please refer to the Knowledge Base.
About CloudsLinker:
CloudsLinker is a game-changer in cloud data transfer, enabling high-speed movements between over 30+
cloud storage platforms like Proton Drive and Google Drive, without consuming local
bandwidth or
data. This cloud-based solution ensures efficient and hassle-free file migration, saving your local
internet resources and simplifying cloud storage management.
Step 1: Initiating the Transfer with Cloudslinker
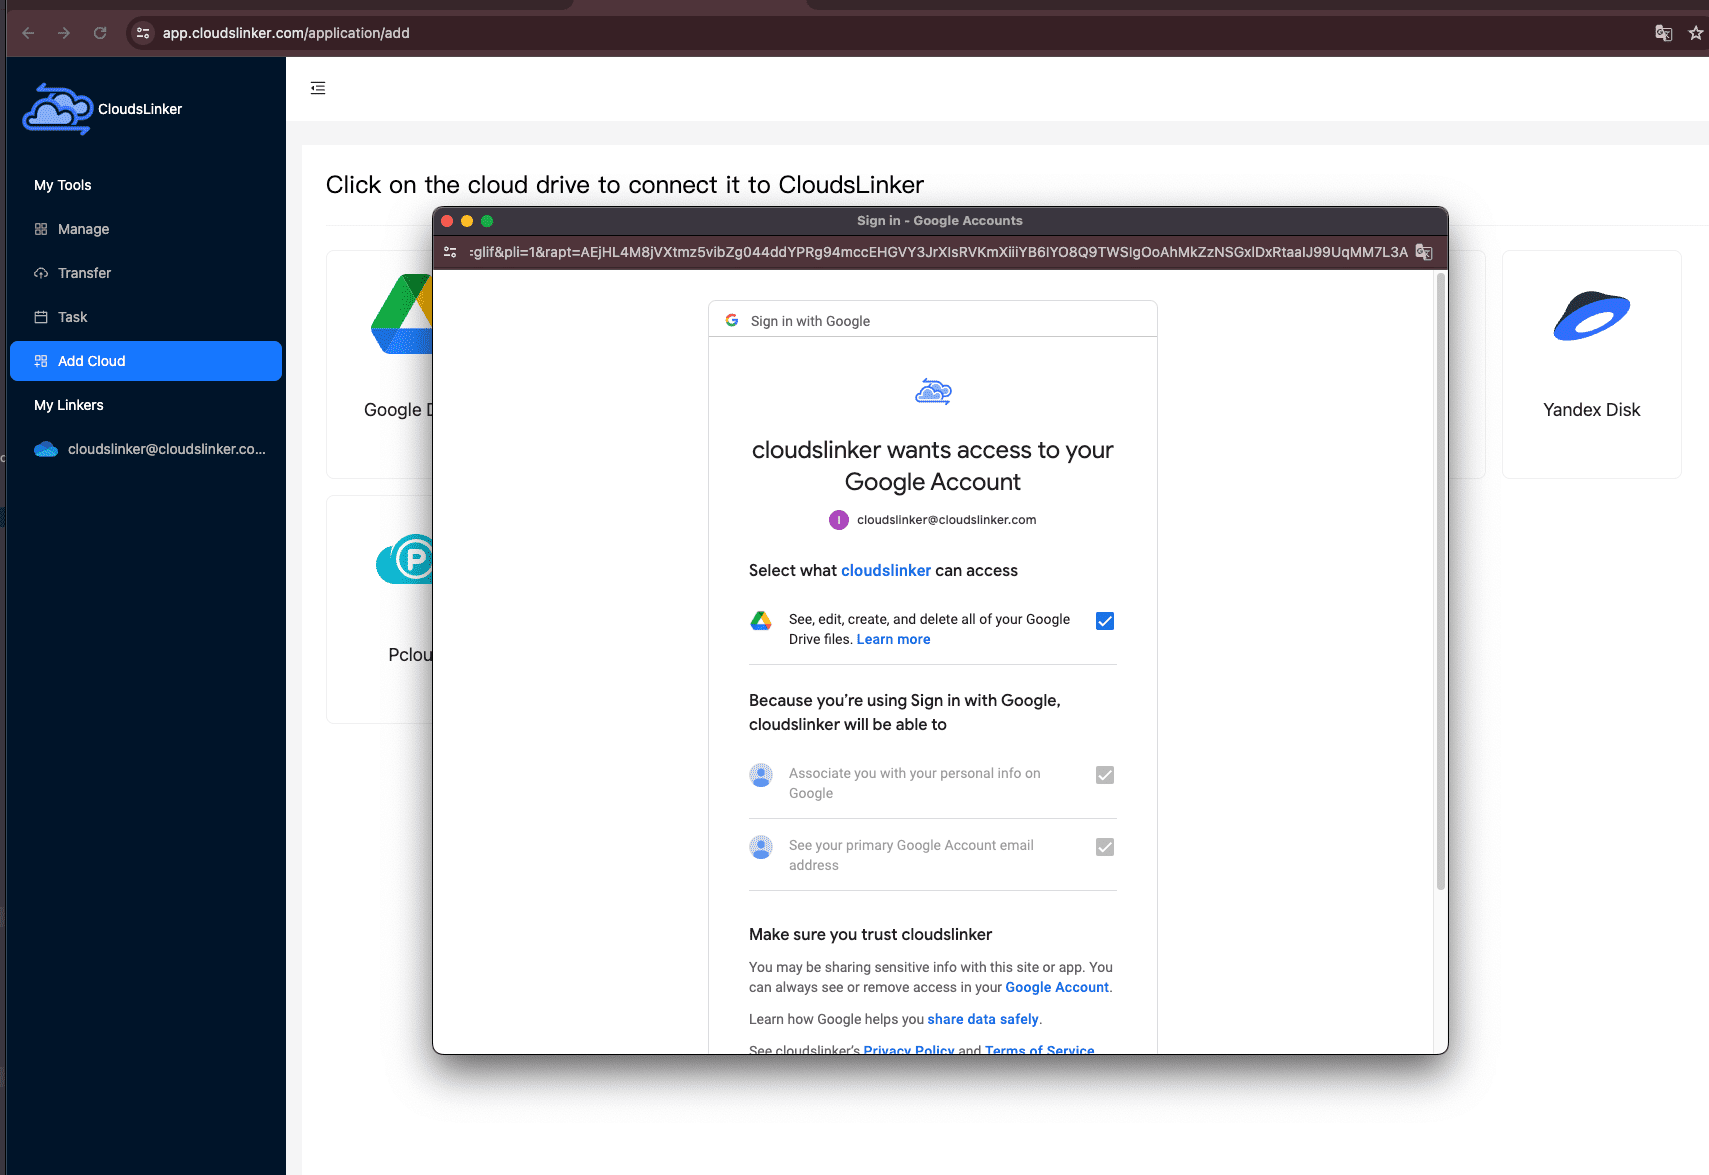
Start by accessing Cloudslinker. First, add your Seafile account, followed by Google Drive, granting Cloudslinker the required permissions for efficient file management and transfer.

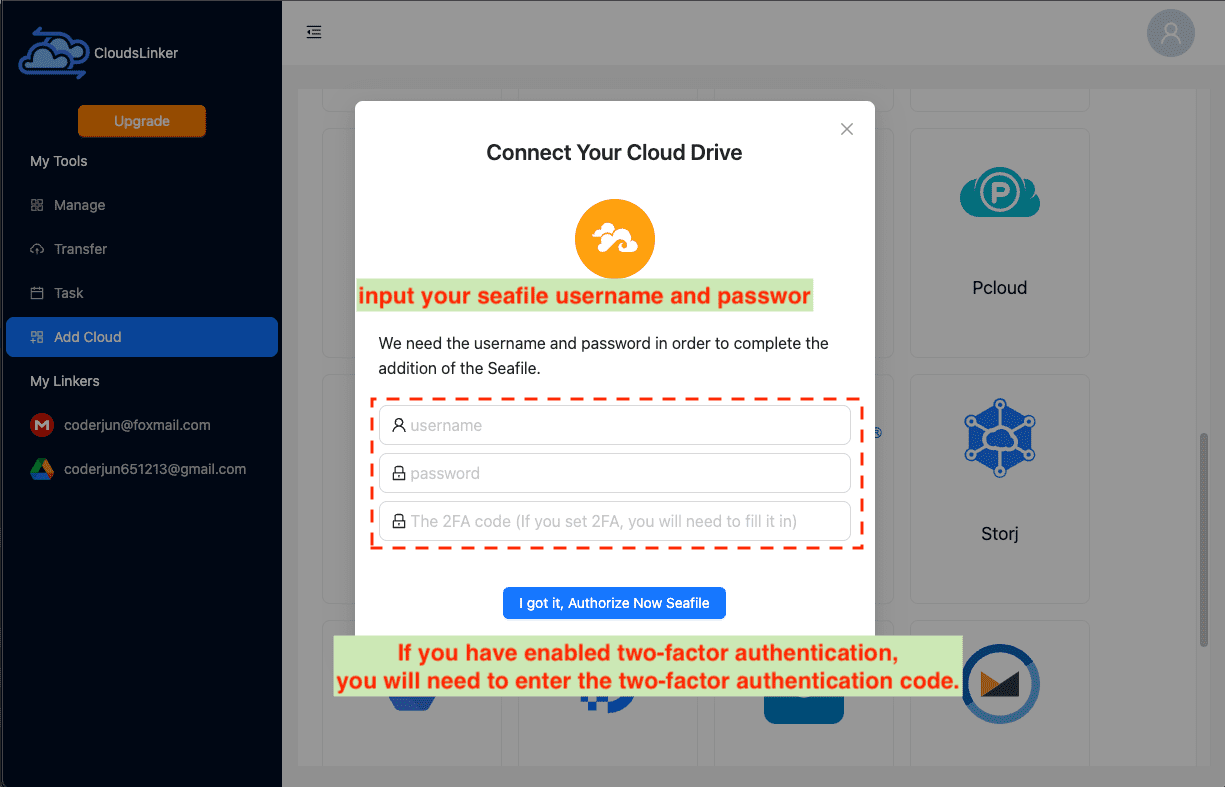
Step 2: Adding Your Seafile Account
To integrate your Seafile account with Cloudslinker, select the Seafile icon in the Cloudslinker
interface. This action takes you to the Seafile addition page. Input your Seafile username and
password. For users with two-factor authentication enabled on their Seafile account, you'll also
need to enter your two-factor verification code. Cloudslinker employs advanced encryption to ensure
the security of your credentials. After entering your details, click the Add button to
complete adding your Seafile account to Cloudslinker.

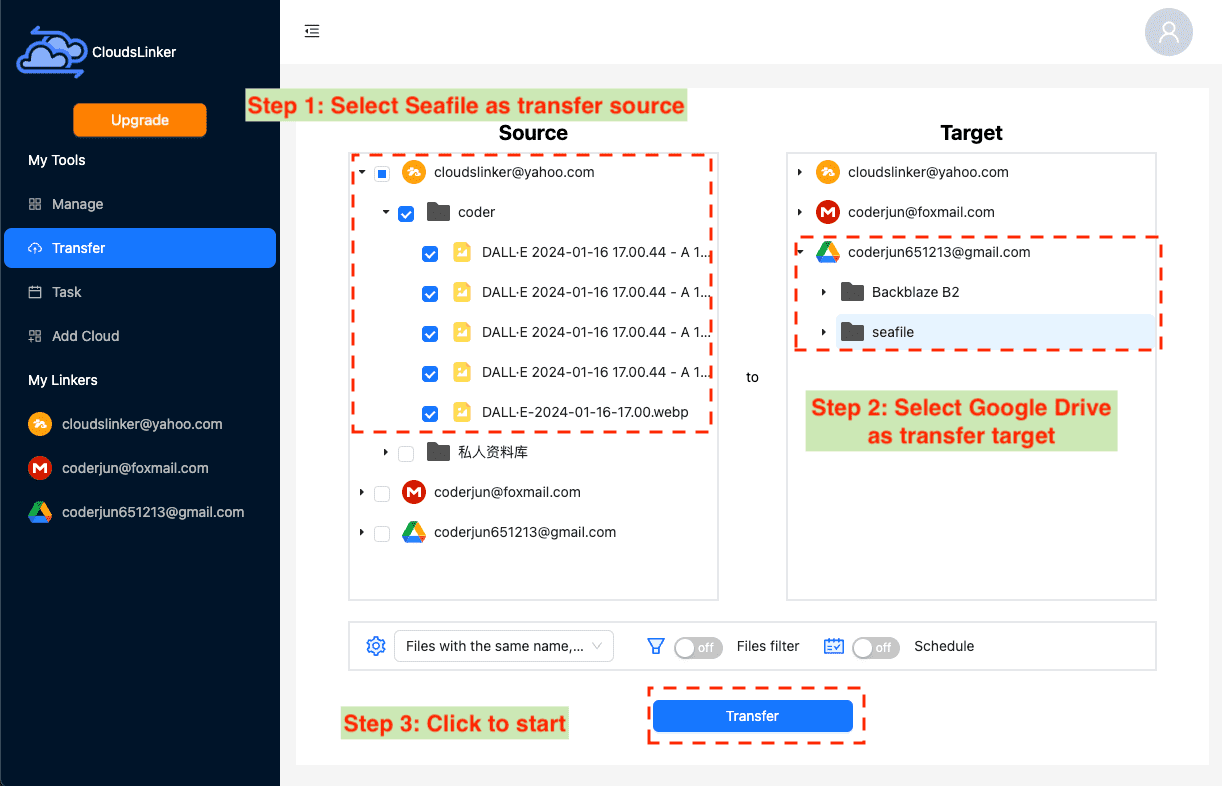
Step 3: Configuring Your Transfer in Cloudslinker
In Cloudslinker's 'Transfer' section, set up your source and destination for the transfer. Select your Seafile account as the source and Google Drive as the destination.

Utilize Cloudslinker’s filtering options to choose specific file types or sizes for the transfer. To learn more about filter settings, visit the Cloudslinker Filter Settings. Cloudslinker also supports scheduling transfers at your convenience, either on a recurring basis or as a one-time event. Details on this can be found in the Cloudslinker Schedule Settings guide.
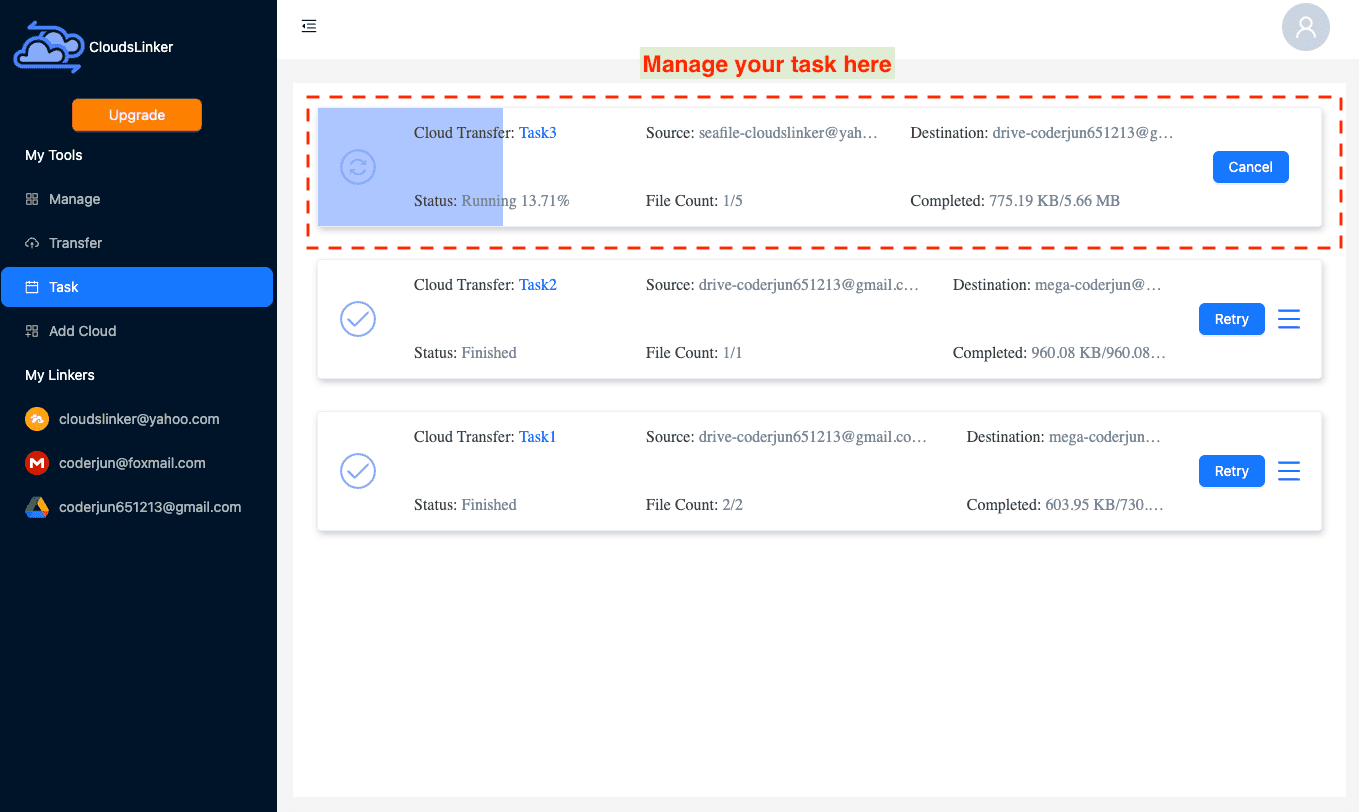
Step 4: Monitoring Transfer Progress in Cloudslinker
Track the progress of your file transfers in Cloudslinker by visiting the 'Task' section. This feature allows you to manage, modify, or cancel transfer tasks as needed.

Step 5: Confirming Transfer Completion
Once the transfer is complete, verify that your files have been successfully moved from Seafile to Google Drive. Check the integrity of the files to ensure all necessary data has been transferred to your Google Drive account.

Frequently Asked Questions
Conclusion
Successfully transferring files from Seafile to Google Drive with Cloudslinker marks a significant advancement in managing digital content across multiple cloud platforms. The process, characterized by simplicity and efficiency, involves a few straightforward steps: adding your Seafile account, configuring the transfer, and confirming its completion. Cloudslinker's notable features like advanced file filtering, scheduled transfers, and robust security measures make it an invaluable tool for anyone seeking to streamline their cloud storage management. By bridging the gap between Seafile and Google Drive, Cloudslinker not only enhances collaboration and productivity but also ensures a seamless, secure, and efficient digital experience for both personal and professional use
Online Storage Services Supported by CloudsLinker
Transfer data between over 40 cloud services with CloudsLinker
Didn' t find your cloud service? Be free to contact: [email protected]
Further Reading
Effortless FTP connect to google drive: Transfer Files in 3 Easy Ways
Learn More >
Google Photos to OneDrive: 3 Innovative Transfer Strategies
Learn More >
Google Photos to Proton Drive: 3 Effective Transfer Techniques
Learn More >


