Cloud-to-Cloud : Data Transfer from Premiumize to OneDrive
Easily transfer files between cloud services without consuming local bandwidth. Cloudslinker simplifies the process, enabling smooth file transfers from Premiumize to OneDrive, and improving your digital organization.
Introduction
Navigating the complexities of managing files across multiple cloud storages is a key aspect of today's digital workflows. Cloudslinker offers a bandwidth-efficient solution, particularly for those transferring data from Premiumize to OneDrive. Utilizing server-side transfers with substantial bandwidth, Cloudslinker ensures that your local internet usage remains unaffected. This guide will illustrate how to effectively use Cloudslinker for seamless, high-speed file transfers, making it an indispensable tool for individuals and professionals who prioritize efficient and economical cloud storage management.
Moving files from Premiumize to OneDrive brings several advantages, boosting efficiency and enhancing your file management experience:
- Advanced Security Measures: Premiumize ensures high-level security for your data, including top-tier encryption protocols.
- Expansive Storage Options: OneDrive offers generous storage solutions. Discover OneDrive's storage plans, including scalable solutions for different needs.
- Intuitive User Interface: Premiumize features a user-friendly platform, making file management straightforward and accessible.
- Direct Access and Sharing: Easily access and share your files directly from OneDrive, enhancing collaboration and accessibility.
- Flexible Subscription Models: Premiumize and OneDrive both offer diverse subscription plans, catering to various user requirements.
- Dependable Service: Rely on the stability and uptime of both Premiumize and OneDrive for uninterrupted access to your files.
- Customizable Sharing Options: Adjust your file-sharing settings on OneDrive, including permissions and security, for tailored access.
While Premiumize offers distinct features for file security and access, OneDrive’s integration with Microsoft’s suite and scalability makes it a valuable choice for comprehensive file management.
Efficient File Transfers with CloudMover
CloudMover streamlines the process of moving data between cloud platforms, facilitating seamless cloud-to-cloud transfers without requiring local data management. It supports continuous synchronization tasks and is renowned for its comprehensive filtering capabilities and intuitive interface. For additional details, explore the Resource Center.
Step 1: Begin the File Transfer
Initiate your file transfer process by logging into the transfer tool. Start by connecting to your
Premiumize account. This will involve authorizing the tool to access your Premiumize files.
Go to the Add Cloud section and select Premiumize to create a connection.

In the pop-up window that appears for Premiumize authorization, click Yes to grant the
necessary permissions
and complete the authorization for the CloudsLinker.

Step 2: Integrating OneDrive Account
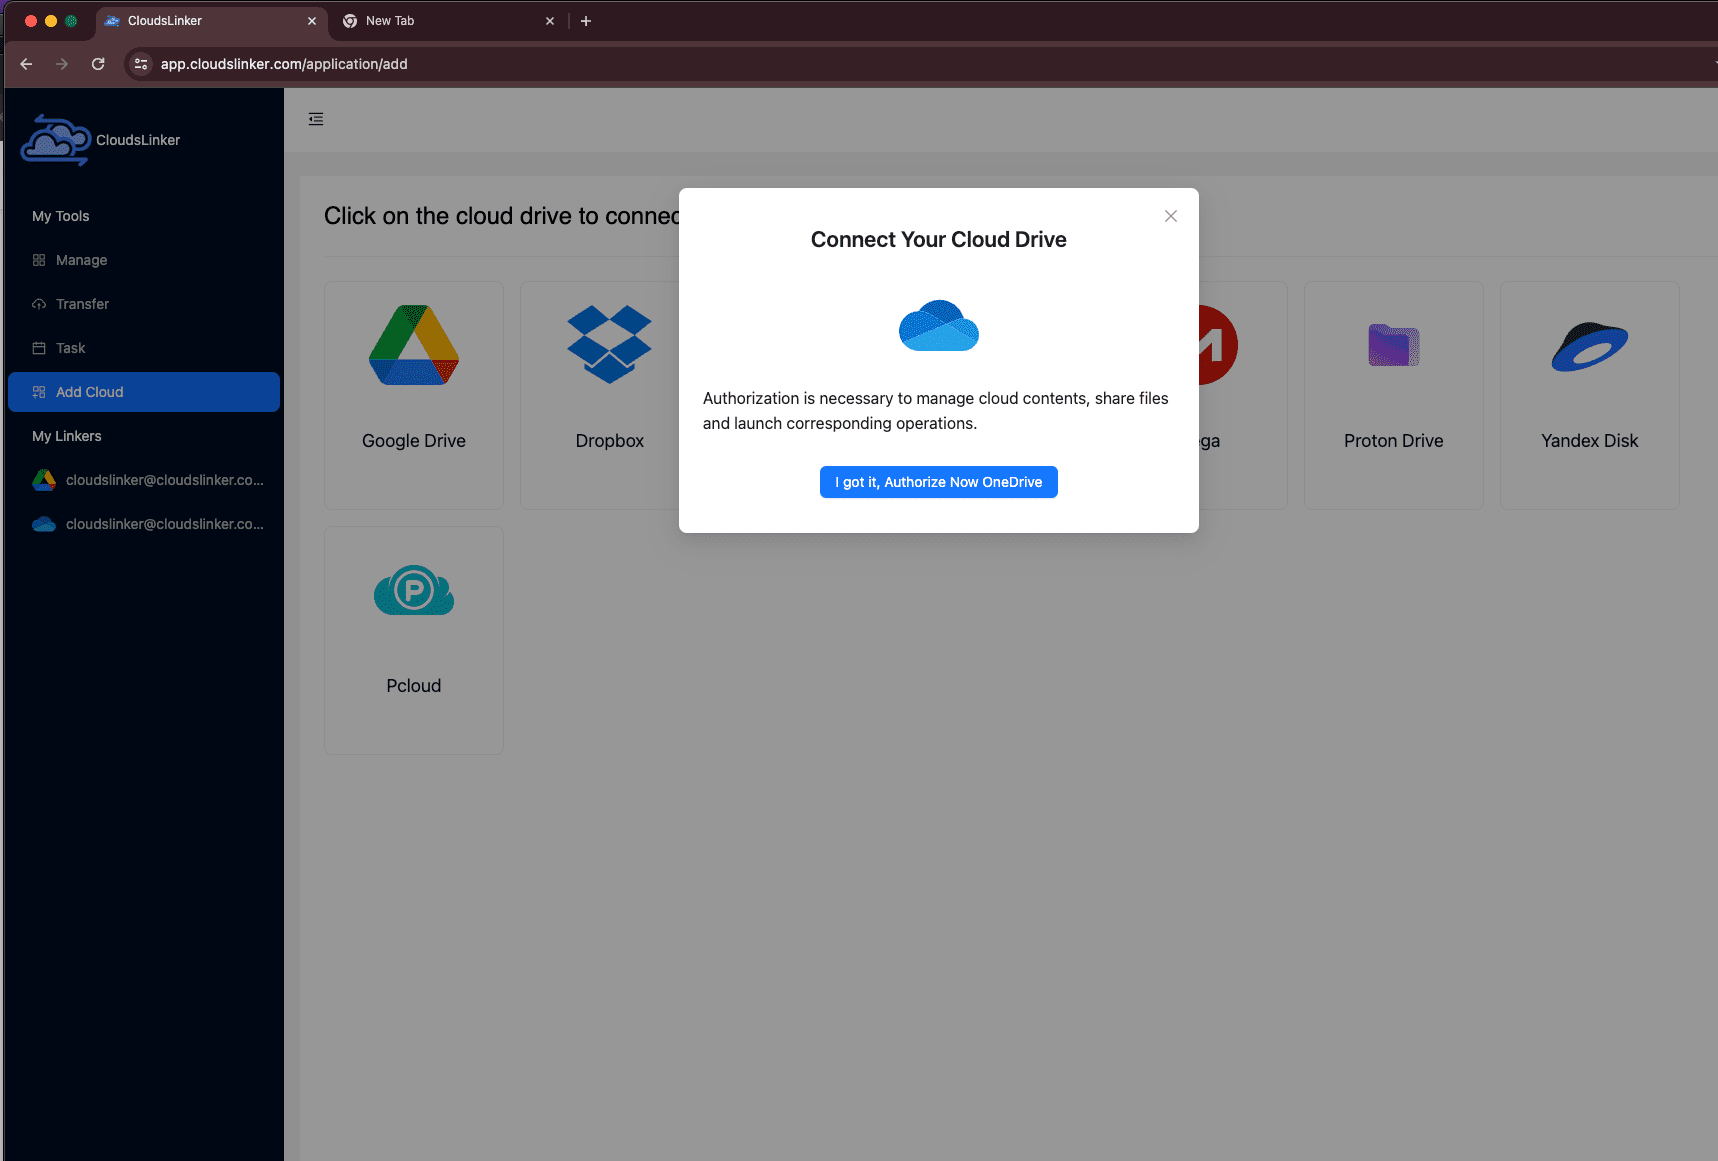
To integrate your OneDrive account with Cloudslinker, the process is streamlined for ease of use. Begin by navigating to the 'Add Cloud' page within the Cloudslinker interface. Here, simply select OneDrive from the list of available cloud services.

Upon selecting OneDrive, you will be automatically redirected to the OneDrive authorization page. Follow the on-screen instructions to grant Cloudslinker access to your OneDrive account. This step ensures a secure and efficient connection for managing your files.
Step 3: Setting Up File Migration
In the file migration interface, configure your transfer settings. Choose Premiumize as the source and OneDrive as your destination for the file transfer.

Take advantage of the platform's filtering options to tailor your file transfer. You can exclude specific file types or sizes based on your needs. For detailed instructions on how to set up these filters, consult the File Migration Filter Guide.
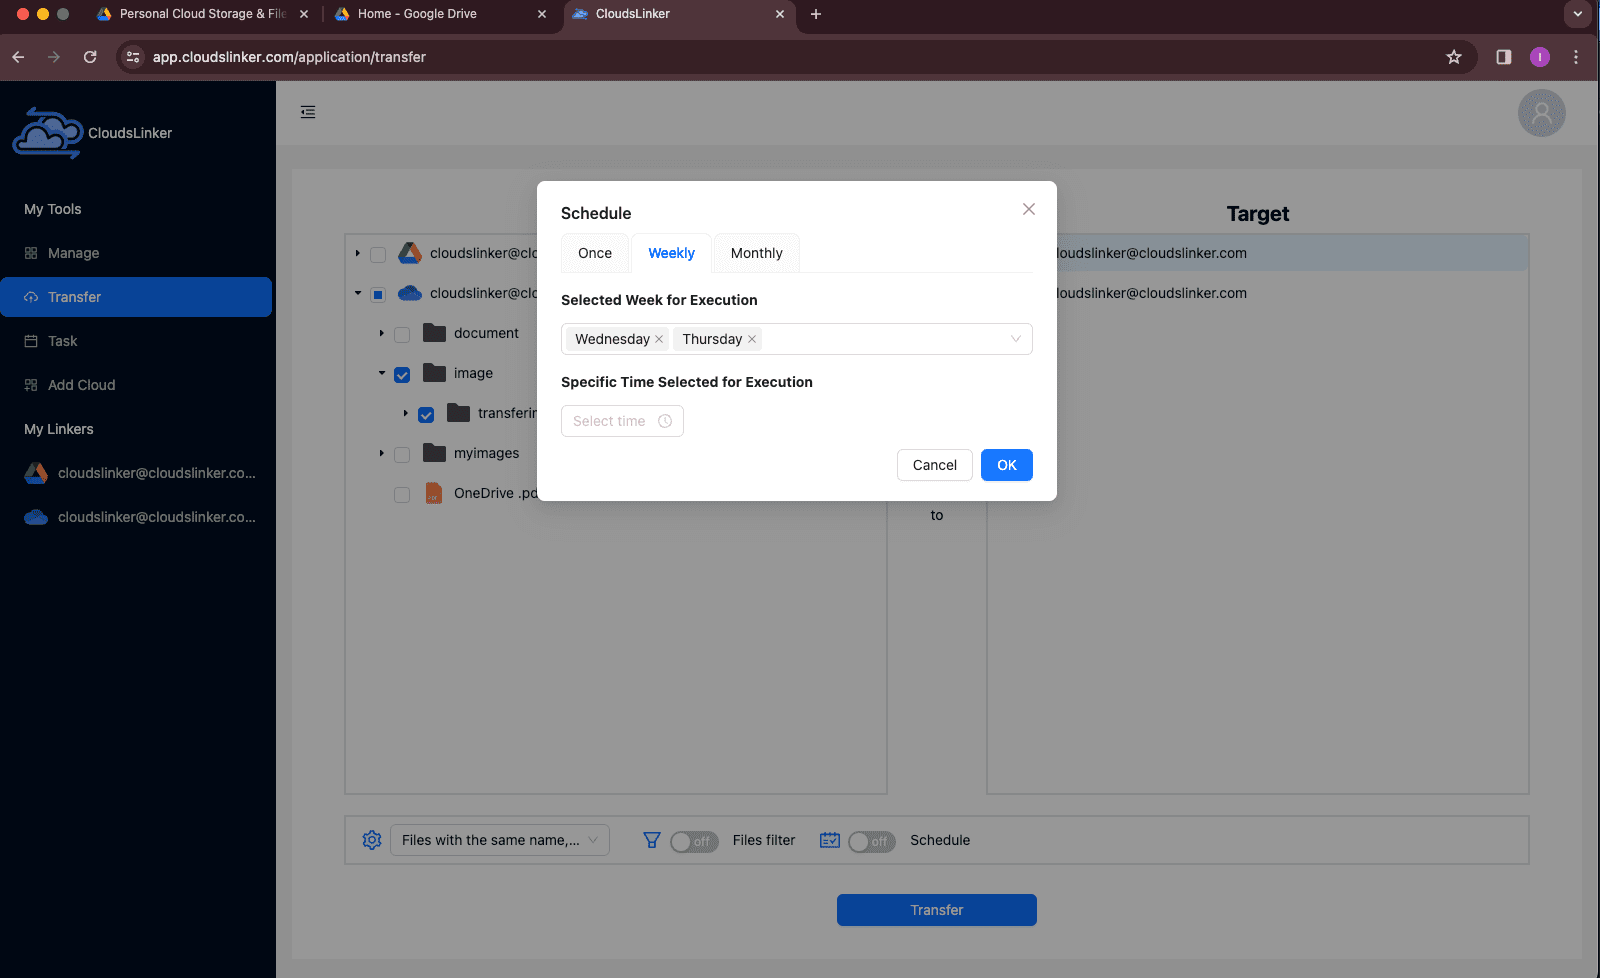
The tool also provides options for scheduled transfers. Plan your file transfers according to your convenience - whether it’s daily, weekly, or on specified dates. For more information on how to arrange scheduled transfers, see the Scheduled Transfer Setup Guide.

Step 4: Track Your Transfer Progress
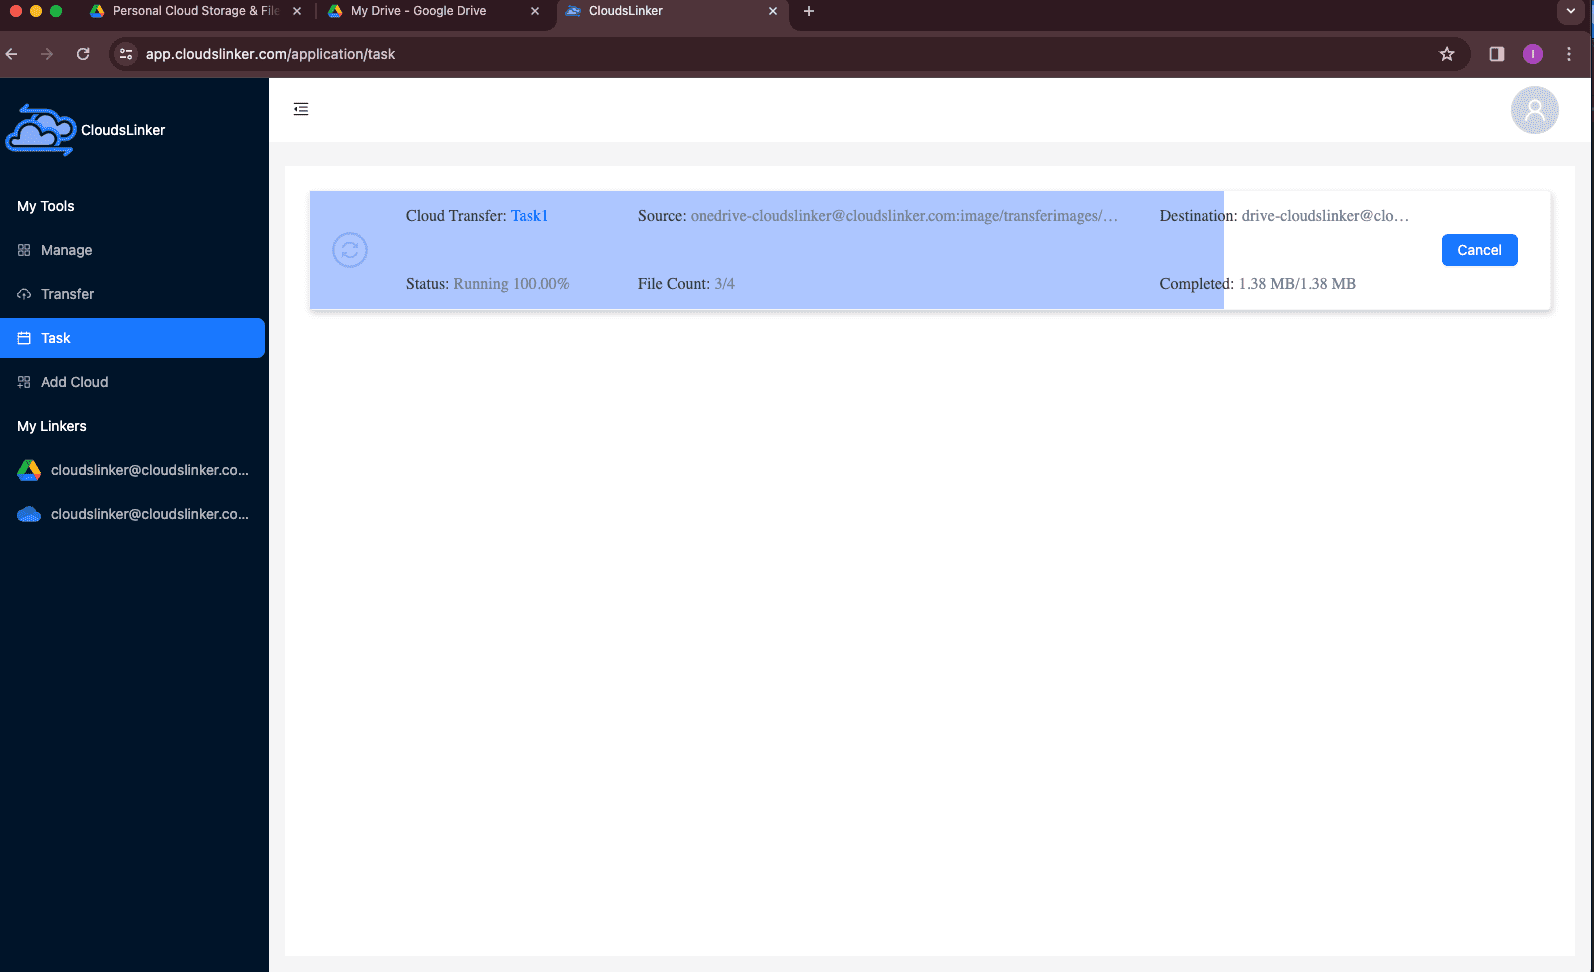
Monitor the progress of your file transfers in the 'Task Monitoring' area. In this section, you can view active transfers and have the flexibility to adjust or cancel tasks as necessary.

Step 5: Verifying Transfer Completion
Upon completion of the transfer process, you will receive a notification confirming that your files have been successfully moved from Premiumize to OneDrive. This confirmation ensures that your data is now securely stored in your designated destination.
Note:
This transfer tool goes beyond OneDrive, supporting transfers with various cloud services:
- Google Drive
- Dropbox
- MEGA
- Various S3-compatible storages
- Proton Drive
- For more, please see the main page.
Additionally, it facilitates reverse transfers from other cloud platforms back to Premiumize, broadening your cloud management options.
Conclusion
Transferring files from Premiumize to OneDrive using Cloudslinker is a straightforward and bandwidth-efficient process. The user-friendly interface of Cloudslinker, combined with its ability to conduct server-side transfers at high speeds, makes it an exceptional choice for managing files across cloud platforms without impacting your local internet resources.
Online Storage Services Supported by CloudsLinker
Transfer data between over 44 cloud services with CloudsLinker
Didn' t find your cloud service? Be free to contact: [email protected]
Further Reading
Effortless FTP connect to google drive: Transfer Files in 3 Easy Ways
Learn More >
Google Photos to OneDrive: 3 Innovative Transfer Strategies
Learn More >
Google Photos to Proton Drive: 3 Effective Transfer Techniques
Learn More >


