How to Efficiently Transfer Files from Google Drive to PikPak
Navigating the complexities of moving files from one cloud storage provider to another can be daunting. This guide offers a clear and easy-to-follow method for transferring your important documents and files from Google Drive to PikPak. Discover the seamless way to enhance your cloud storage management and ensure your data is where you need it, when you need it.
Introduction
In today's interconnected world, the ability to manage data across multiple cloud platforms is more crucial than ever. For those looking to shift their digital assets from Google Drive to PikPak, this guide provides a straightforward and efficient approach. You will learn how to utilize simple tools to make your file transfer process both quick and secure, an essential skill for both professional and personal cloud storage management.
Transitioning from Google Drive to PikPak offers unique benefits, especially for users seeking enhanced cloud storage capabilities:
- Expansive Storage Space: PikPak provides up to 10TB of cloud storage, capable of storing around 8000 video files, making it a substantial upgrade for those needing more space.
- Telegram Bot Integration: With PikPak's powerful Telegram Bot, users can enjoy one-click forwarding to save files and links directly from Telegram, offering a streamlined experience.
- Accelerated File Saving: PikPak's leading acceleration technology ensures quick saving of all files via cloud transfer, enhancing efficiency.
- Advanced File Preview: Enjoy the convenience of an intuitive interface with easy preview options for images and videos in PikPak, offering a user-friendly experience.
While Google Drive excels in collaboration tools and integration with Google Workspace, PikPak's significant storage space, unique Telegram Bot feature, rapid file transfer capabilities, and user-friendly preview options position it as a highly competitive choice for personal and professional cloud storage needs.
Optimizing File Transfers from Google Drive to PikPak with Cloudslinker
Cloudslinker offers a streamlined solution for transferring data from Google Drive to PikPak, featuring direct cloud-to-cloud transfers that bypass the need for local data storage. Renowned for its proficiency in managing continuous synchronization tasks and advanced file selection capabilities, Cloudslinker ensures an effortless and efficient file management process. Its user-friendly interface caters to both novice and advanced users, simplifying the complexities of cloud storage management. For comprehensive guidance on utilizing Cloudslinker for Google Drive to PikPak transfers, visit the Knowledge Base.
Step 1: Initiating the Process with Cloudslinker
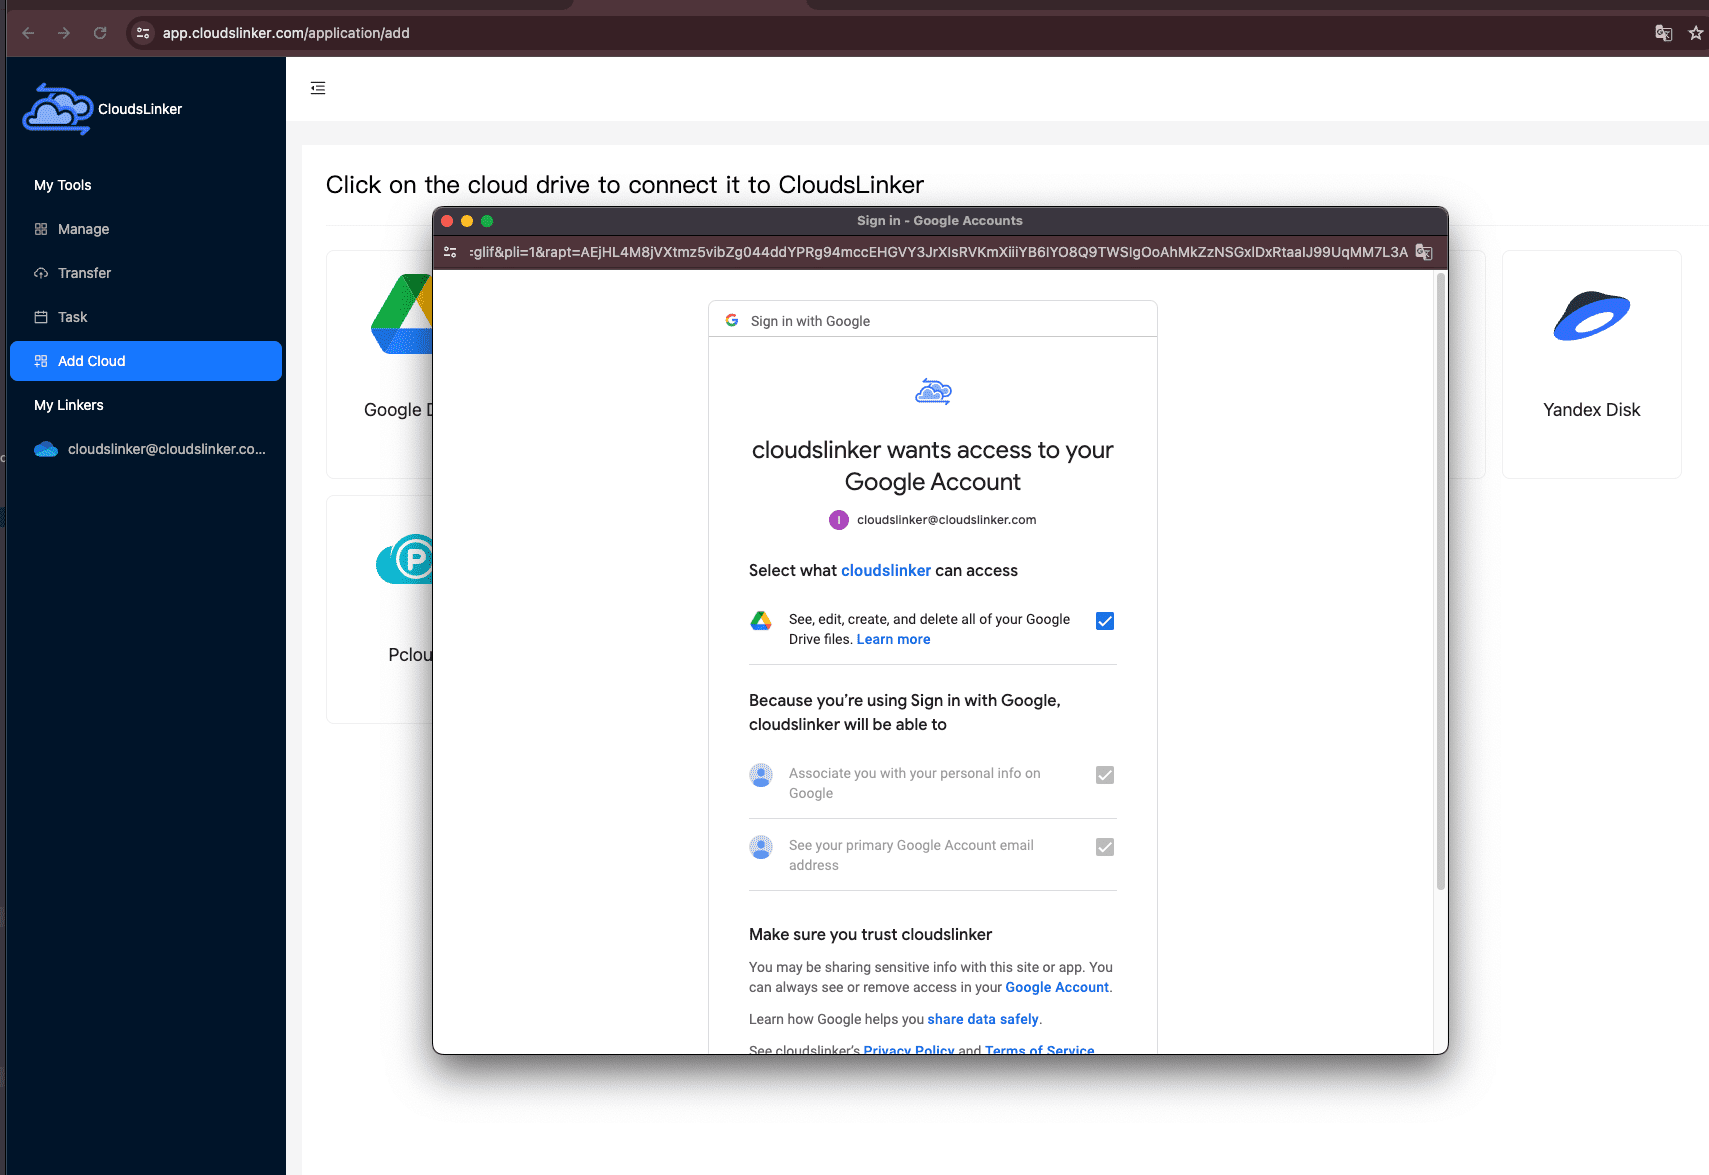
Start by signing into Cloudslinker. First, you'll need to integrate your Google Drive account. Grant Cloudslinker the necessary permissions to access your Google Drive for seamless file management and transfer. This step is crucial for establishing a secure connection between your cloud storage and Cloudslinker.
Step 2: Integrating PikPak with Cloudslinker
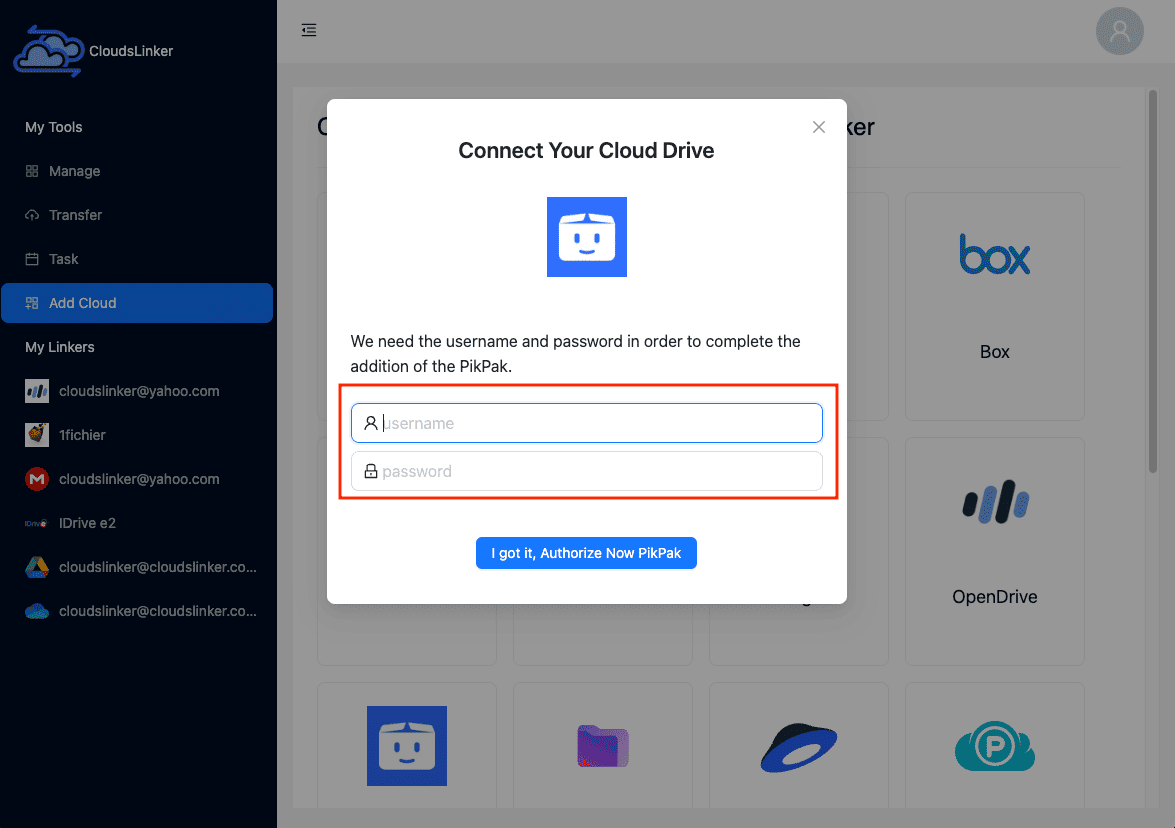
Incorporating your PikPak account into Cloudslinker is straightforward. In the Cloudslinker
dashboard, click on the PikPak icon to access the account addition interface. Here, you'll be
prompted to input your PikPak credentials. Rest assured, Cloudslinker employs robust encryption
methods to safeguard your login information. Once your PikPak details are entered, hit the
Add button to complete the integration.
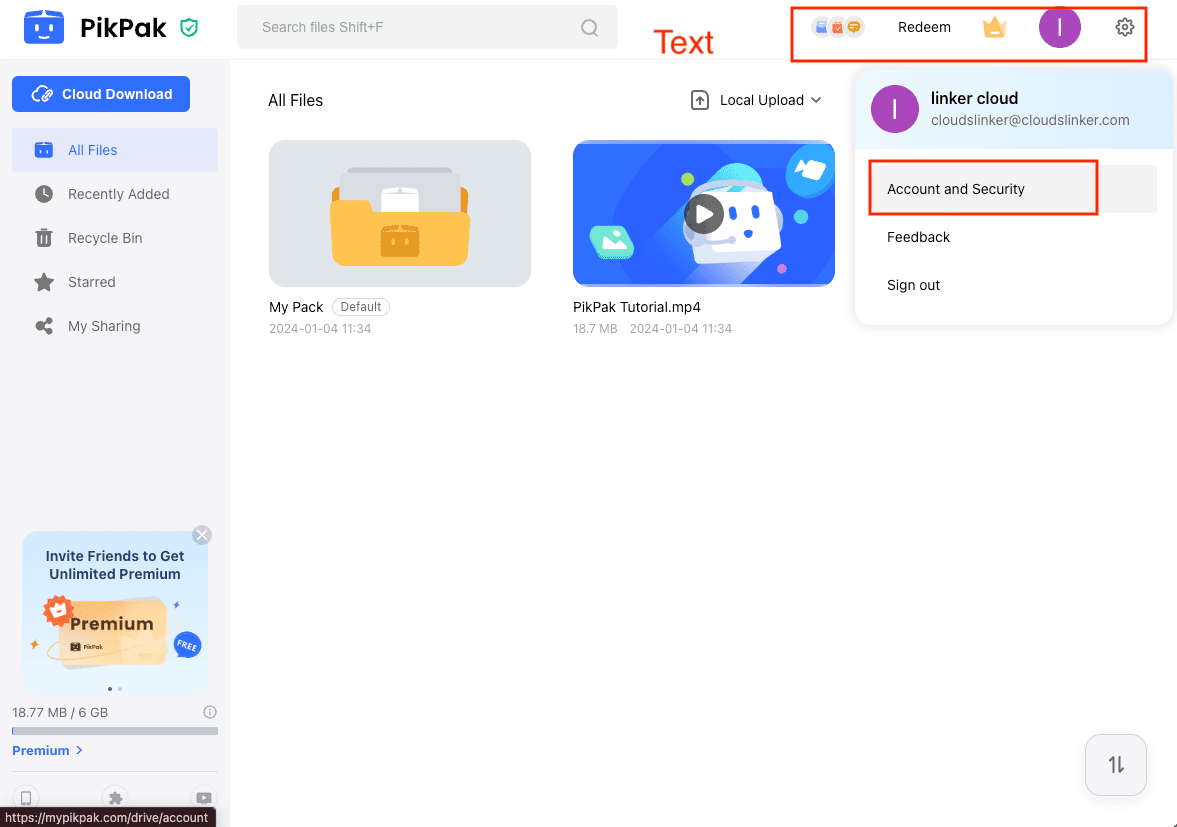
For those who have used a third-party service like Google or Facebook to sign into PikPak, setting a
direct password for PikPak is necessary. Begin by visiting the PikPak website. Navigate to your profile settings by clicking your avatar at
the top left corner, then select Account and Security.
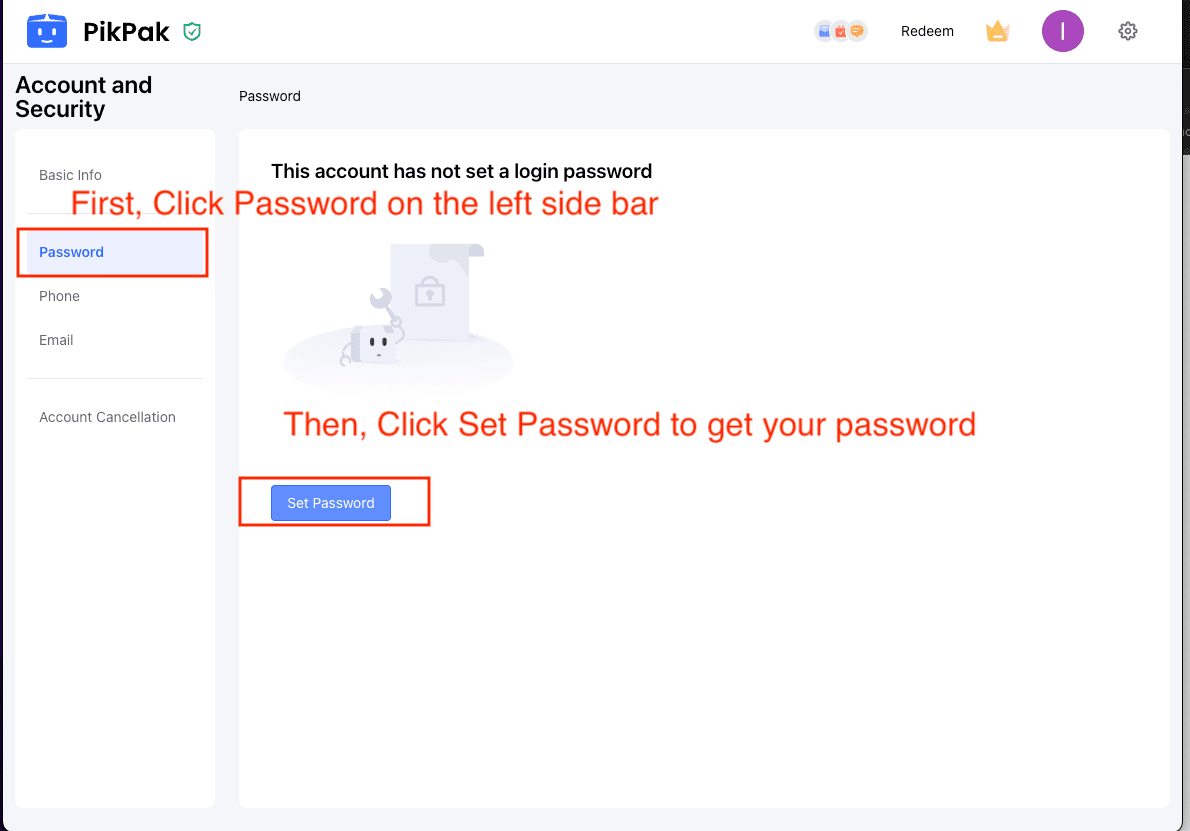
In the settings menu, locate and click on Password from the sidebar. Follow the prompts
to establish a new password, ensuring secure access for Cloudslinker integration.
Step 3: Setting Up Your Transfer in Cloudslinker
In Cloudslinker, navigate to the 'Transfer' section to specify your source and target for the file transfer. For this task, select Google Drive as your source and PikPak as the destination. This step is vital in directing where and how your files will move between the cloud services.
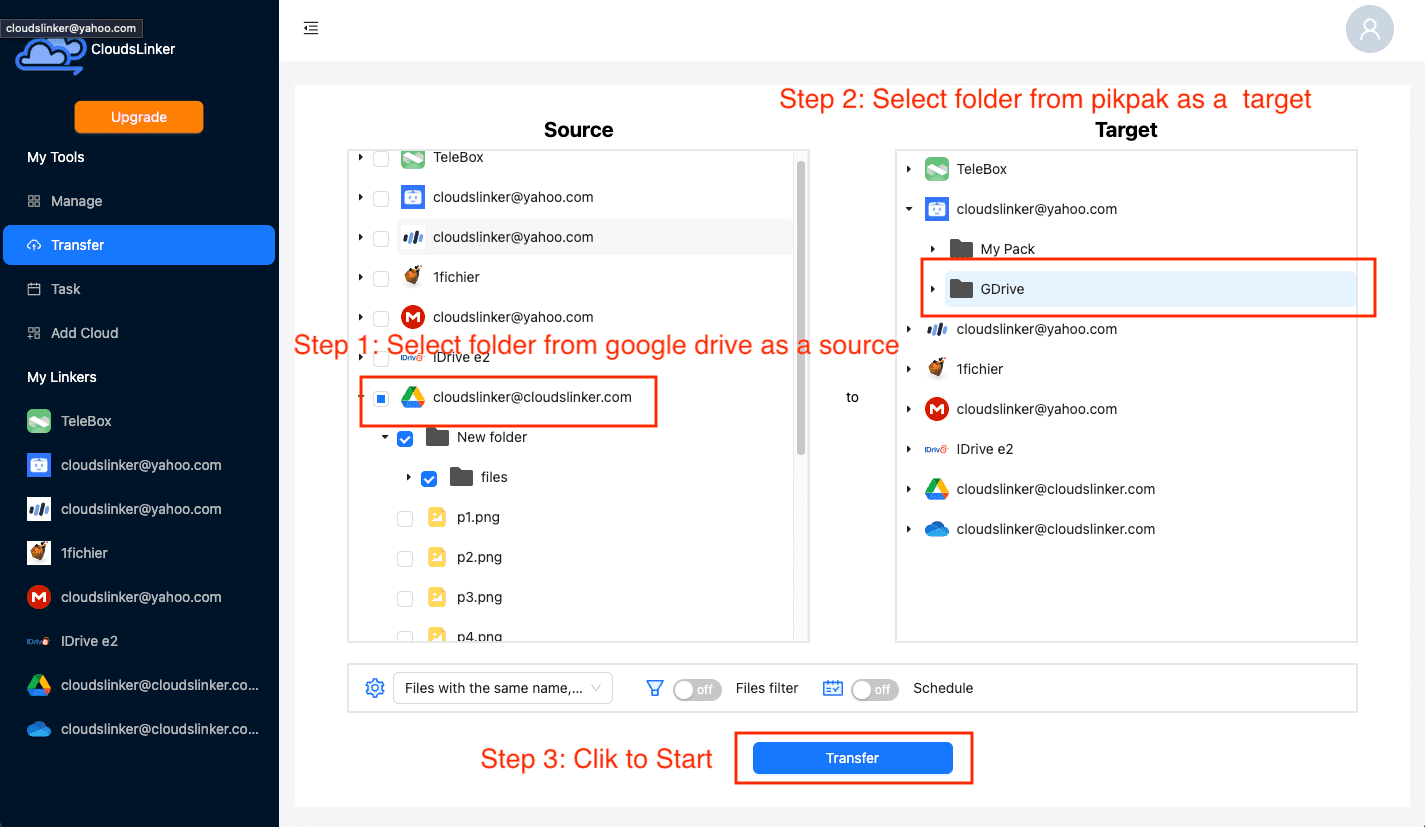
Cloudslinker offers sophisticated filtering options to refine your transfer. You can select specific file types or sizes to transfer. For detailed instructions on how to use these filters, refer to Cloudslinker Filter Settings. Additionally, Cloudslinker supports the scheduling of transfers. You can set up transfers to occur regularly - daily, weekly, or on a specified date - or as a single occurrence. Learn more about this feature in the Cloudslinker Schedule Settings guide.
Step 4: Tracking Transfer Status in Cloudslinker
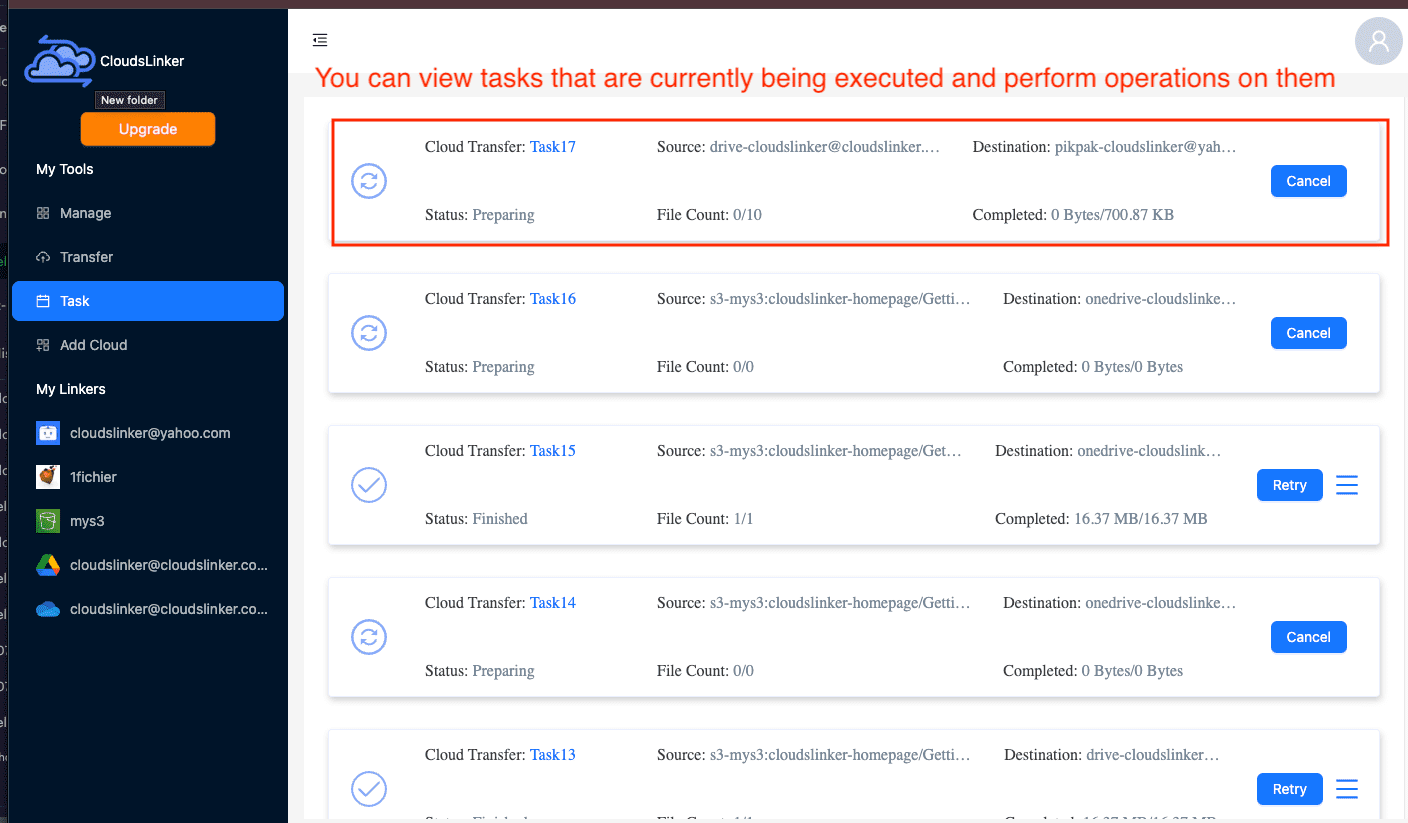
To keep an eye on the progress of your file transfers, visit the 'Task' section within Cloudslinker. This important feature allows you to track the status of each transfer task. You can observe real-time progress, and if necessary, make adjustments to the task, such as modifying parameters or even canceling the transfer if required.
Step 5: Verifying Transfer Completion
Once Cloudslinker indicates that the transfer is complete, it's important to confirm the successful migration of your files from Google Drive to PikPak. Check your PikPak account to ensure that all the files have been transferred correctly. It’s recommended to verify the integrity and completeness of the files in PikPak to ensure no data was lost or corrupted during the transfer.

Conclusion
Migrating files from Google Drive to PikPak can be a smooth and hassle-free experience. The process outlined here, involving easy steps for initiation and completion of the transfer, ensures a user-friendly approach. The utility and convenience offered by the tools discussed, such as automated syncing and file organization, make managing your digital content across different cloud services a breeze.
Online Storage Services Supported by CloudsLinker
Transfer data between over 40 cloud services with CloudsLinker
Didn' t find your cloud service? Be free to contact: [email protected]
Further Reading
Effortless FTP connect to google drive: Transfer Files in 3 Easy Ways
Learn More >
Google Photos to OneDrive: 3 Innovative Transfer Strategies
Learn More >
Google Photos to Proton Drive: 3 Effective Transfer Techniques
Learn More >


